Introduction
Zuva Document Viewer is a React component that enables the annotation of documents using data in a format similar to what the Zuva Layouts and Extract APIs provide.
This tutorial will cover how to retrieve and transform data from Zuva API responses into the data formats that Zuva Document Viewer can use to display documents and annotations.
Upon finishing this tutorial, you should be left with a React application that accepts a document, extracts Title, Party, and Date fields from it, and displays the extractions with the document using the Zuva Document Viewer. However, there are some things to keep in mind:
- This project uses a proxy as its backend to avoid running into issues with CORS, as directly accessing the Zuva APIs from the browser is strongly discouraged. This proxy has no authentication configured; do not copy the demo project backend for use in a production environment.
- The Zuva Document Viewer may not fit your needs perfectly as-is, it is recommended that you create a fork to fit your needs. The source is available here.
This tutorial is also available on Github as a project written in plain Typescript.
What will you learn?
The following is what you will learn by going through this tutorial:
- How to submit a document to Zuva
- How to create an OCR request
- How to create an Extraction request
- How to transform data into a format that Zuva Document Viewer can use
Requirements
To follow this tutorial, you will need:
Note: the OCR endpoints required for this tutorial are not available when using the free plan. Please reach out to Support to inquire about upgrading your account to a paid or trial plan.
Overview
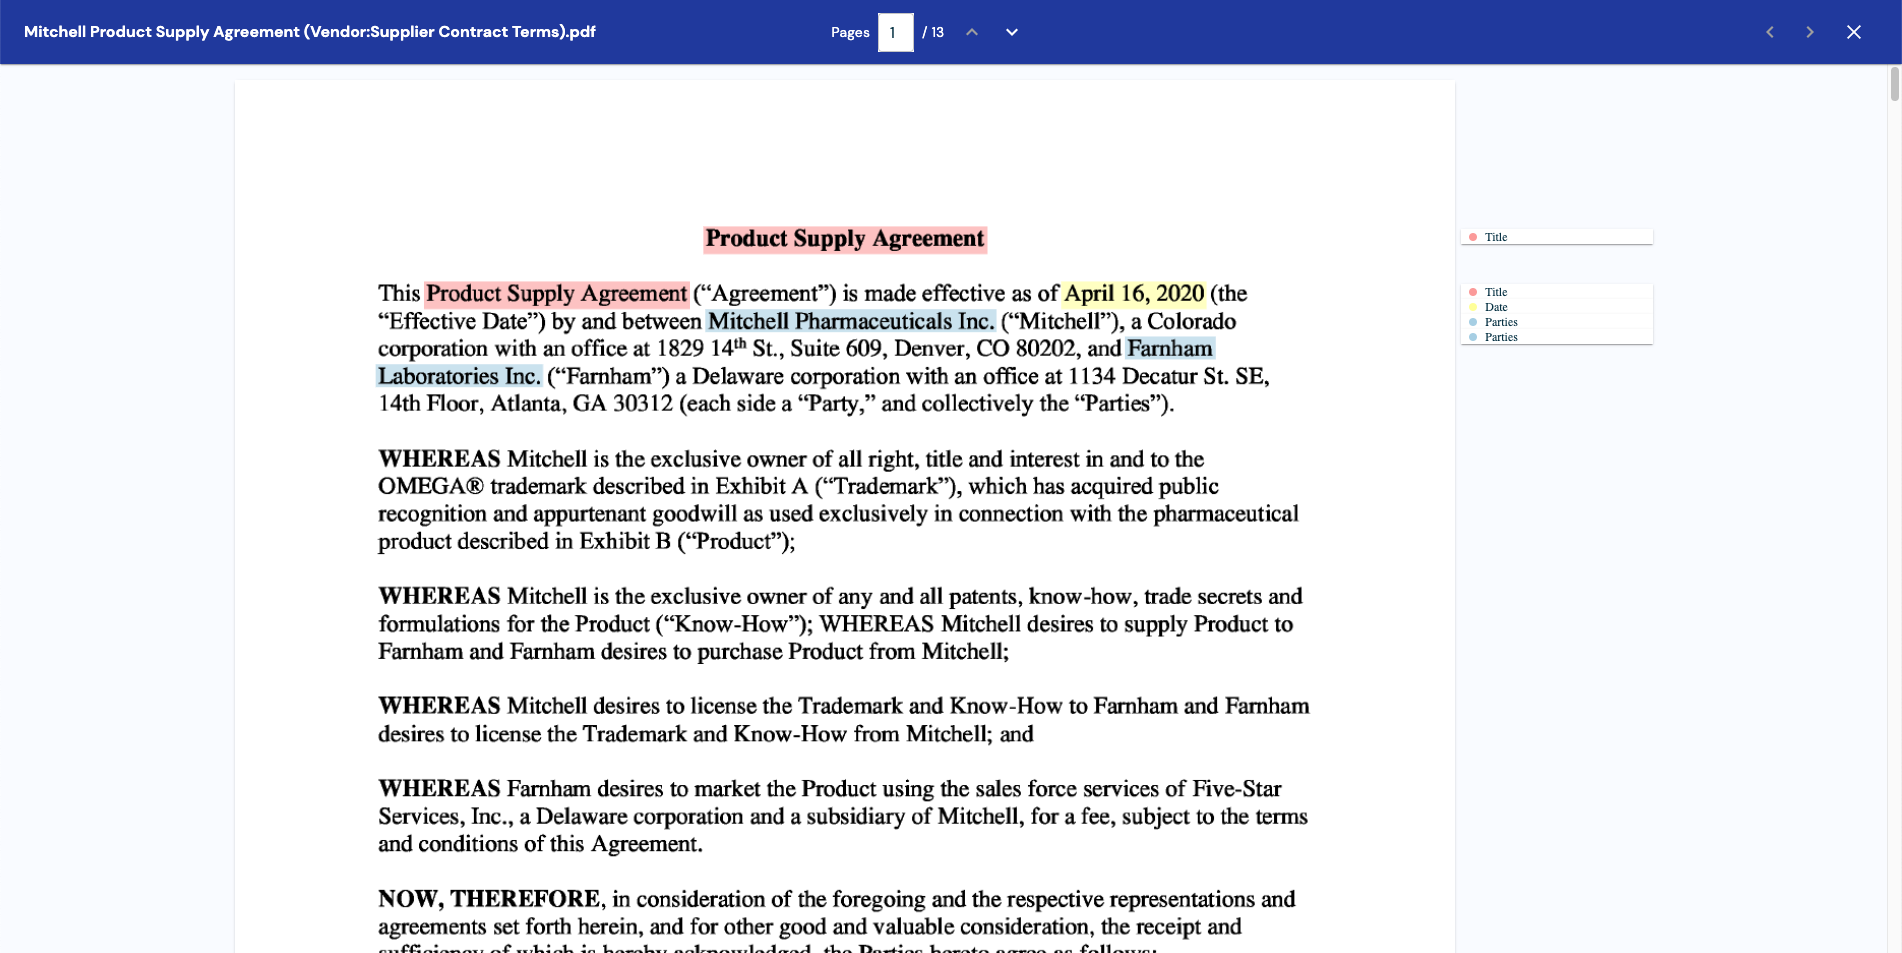
Zuva Document Viewer consumes props that can be derived from data returned from Zuva Extraction results, Zuva OCR page image, and Zuva OCR layouts (for more information about dealing with layouts, refer to Using Layouts). An example of the props can be found in the document-viewer README.
The props that are needed to display documents are:
DocumentViewer consumes annotations, an array of Annotation.
- Each
Annotation has a characterStart and characterEnd, the range of characters that make up the annotation - Each
Annotation has a pageStart and pageEnd, the range of pages that the annotation spans - Each
Annotation has a top and left (in pixels) indicating the top-left corner of the annotation - Each
Annotation has a topic, which is the name of the group of annotations it is a part of
DocumentViewer consumes name, the name of the document being shown.
DocumentViewer consumes pages, an array of Page.
- Each
Page has the originalHeight and originalWidth (in pixels) - Each
Page has an imageURL, the URL of an image that represents the page - Each
Page has a tokensURL, the URL of an array of Token within the page- Each
Token has a line (number), the line on the page the token is in - Each
Token has a BoundingBox - Each
Token has a characterStart and characterEnd, the range of characters that make up the token
DocumentViewer consumes topics, an array of strings that are used to group annotations together
DocumentViewer also consumes props for lazyLoadingWindow which is the number of pages that will be loaded around the current page, as well as onAnnotationCreate, onAnnotationDelete, onClose, onNextDocument, and onPreviousDocument which are used to provide functionality to the navbar.
Backend
The Zuva APIs do not permit cross-origin requests to be made to it, so requests cannot be made to it from the frontend. Cross-origin requests are not permitted since it is not recommended to store your Zuva API token on the frontend where it can be accessible to any user.
The simplest way to get around this challenge is to create a proxy for Zuva that adds the Authorization header with the appropriate token. To do this, can use Express and http-proxy-middleware.
In a new directory, run:
1
2
3
4
| yarn init -y
yarn add cors dotenv express http-proxy-middleware
yarn add -D nodemon ts-node typescript
yarn add -D @types/cors @types/express @types/node
|
Create an entry in package.json with a command to serve the backend.
1
2
3
| "scripts": {
"serve": "nodemon src/server.ts"
},
|
Create a file named .env with the following contents:
1
2
3
4
5
| HOST=localhost
PORT=3001
BASE_URL={DocAI API Base URL}
TOKEN={DocAI API token}
|
Then create a tsconfig.json file:
 1
 2
 3
 4
 5
 6
 7
 8
 9
10
11
12
13
14
15
16
| {
"compilerOptions": {
"module": "commonjs",
"esModuleInterop": true,
"target": "es6",
"noImplicitAny": true,
"moduleResolution": "node",
"sourceMap": true,
"outDir": "dist",
"baseUrl": ".",
"paths": {
"*": ["node_modules/*"]
}
},
"include": ["src/**/*"]
}
|
In a sub-directory named src, create a file called server.ts.
First import the required packages:
1
2
3
4
5
| import cors from "cors";
import * as dotenv from "dotenv";
dotenv.config();
import express from "express";
import { createProxyMiddleware } from "http-proxy-middleware";
|
From there, create the app:
After that, configure the proxy. To prevent Zuva from refusing cross-origin requests, changeOrigin needs to be set to true. http-proxy-middleware also allows a function to be passed to onProxyReq, which allows the Authorization header to be passed to Zuva API:
1
2
3
4
5
6
7
| const proxy = createProxyMiddleware({
target: process.env.BASE_URL,
changeOrigin: true,
onProxyReq: (proxyReq, req, res) => {
proxyReq.setHeader("Authorization", `Bearer ${process.env.TOKEN}`);
},
});
|
Finally, configure Express to use the middleware and listen to requests on the port and host set in .env:
1
2
3
| app.use(cors());
app.use("/", proxy);
app.listen(Number(process.env.PORT) || 3001, process.env.HOST || "localhost");
|
To run the proxy, run:
Requests from the frontend to the Proxy to access the Zuva API can now be made.
Frontend
For purposes of this tutorial, BASE_URL is a variable pointing to the base url of the proxy created in the previous section.
Requirements
For the frontend, create a new project in a new directory. As the Zuva Document Viewer is a React component, this will have to be a React app.
The Zuva Document Viewer package available from GitHub Packages, so configuration will need to be created to install packages. To do this, first create a GitHub personal access token (classic) from https://github.com/settings/tokens with read:packages access enabled.
Then create a file named .npmrc with the following contents, substituting {TOKEN} for the token generated earlier:
//npm.pkg.github.com/:_authToken={TOKEN}
@zuvaai:registry=https://npm.pkg.github.com/
See the GitHub Packages documentation for more information.
Some dependencies will be needed, which can be installed with:
1
2
3
4
| yarn add @emotion/react @emotion/styled @mui/material @zuvaai/document-viewer
yarn add protobufjs
yarn add -D vite @vitejs/plugin-react
yarn add -D @types/react @types/react-dom
|
Then create a tsconfig.json file:
 1
 2
 3
 4
 5
 6
 7
 8
 9
10
11
12
13
14
15
16
17
18
19
20
| {
"compilerOptions": {
"target": "ESNext",
"useDefineForClassFields": true,
"lib": ["DOM", "DOM.Iterable", "ESNext"],
"allowJs": false,
"skipLibCheck": false,
"esModuleInterop": false,
"allowSyntheticDefaultImports": true,
"strict": true,
"forceConsistentCasingInFileNames": true,
"module": "ESNext",
"moduleResolution": "Node",
"resolveJsonModule": true,
"isolatedModules": true,
"noEmit": true,
"jsx": "react"
},
"include": ["./src"]
}
|
Vite is a development environment that provides a fast development server with Hot Module Replacement and fast, optimized builds.
To begin with setting up Vite, create vite.config.ts:
1
2
3
4
5
6
7
8
| import { defineConfig } from "vite";
import react from "@vitejs/plugin-react";
// https://vitejs.dev/config/
export default defineConfig({
plugins: [react()],
server: { port: 3000 },
});
|
and index.html
 1
 2
 3
 4
 5
 6
 7
 8
 9
10
11
12
13
14
15
16
17
| <!doctype html>
<html lang="en">
<head>
<meta charset="UTF-8" />
<link rel="icon" type="image/svg+xml" href="/img/favicon.svg" />
<meta name="viewport" content="width=device-width, initial-scale=1.0" />
<title>Zuva Document Viewer Demo</title>
<link
href="https://fonts.googleapis.com/css2?family=DM+Sans:wght@400;500;700&display=swap"
rel="stylesheet"
/>
</head>
<body style="height: 100vh; margin: 0">
<div id="root" style="display: flex; height: 100%"></div>
<script type="module" src="/src/main.tsx"></script>
</body>
</html>
|
Finally, update package.json to include the scripts to use vite:
1
2
3
4
| "scripts": {
"dev": "vite",
"build": "vite build"
},
|
Configuring React App
In the interest of organizing code and keeping it separated, create an /src directory to put files from this section and subsequent sections.
Fields to perform extractions on are also needed. In order to use fields as well as display them, store the field names along with the IDs. Create a fields.json file with the following contents to start.
 1
 2
 3
 4
 5
 6
 7
 8
 9
10
11
12
13
14
| [
{
"field_name": "Title",
"field_id": "25d677a1-70d0-43c2-9b36-d079733dd020"
},
{
"field_name": "Parties",
"field_id": "98086156-f230-423c-b214-27f542e72708"
},
{
"field_name": "Date",
"field_id": "fc5ba010-671b-427f-82cb-95c02d4c704c"
}
]
|
Types will also be required, create a file named types.ts with these contents:
 1
 2
 3
 4
 5
 6
 7
 8
 9
10
11
12
13
14
15
16
17
18
19
20
21
22
23
24
25
26
27
28
29
30
31
32
33
34
35
36
37
38
39
40
41
42
43
| export type BoundingBox = {
bottom: number;
left: number;
right: number;
top: number;
};
type Span = {
bounds: BoundingBox;
bboxes: {
page: number;
bounds: BoundingBox[];
}[];
end: number;
pages: {
end: number;
start: number;
};
start: number;
};
export type ExtractionResults = {
file_id: string;
request_id: string;
results: {
extractions: {
spans?: Span[];
text: string;
defined_term?: {
term: string;
spans: Span[];
};
}[];
field_id: string;
}[];
};
export type Token = {
line: number;
boundingBox: BoundingBox;
characterStart: number;
characterEnd: number;
};
|
For working with layouts, save recognitionResults.ts in a sub-directory named utils.
Finally, create a main.tsx to render the React app:
1
2
3
4
5
6
| import React from "react";
import { createRoot } from "react-dom/client";
import App from "./App/App";
createRoot(document.getElementById("root")!).render(<App />);
|
and App.tsx in a new sub-directory named App to serve as the app content:
1
2
3
4
5
| import React from "react";
const App = (): JSX.Element => {};
export default App;
|
yarn dev may now be used to start the development server.
Collecting Files
To start, a file needs to be collected from the user and submitted it to Zuva API. This can be done with a state variable and React element to update it with a user upload.
Add the following line to the App function body:
1
| const [file, setFile] = React.useState<File>();
|
The following React component will accept a file input from the user and call setFile to pass the file to its parent component. Create a sub-directory in /src/App named Pages, and create a file named Upload.tsx in it:
 1
 2
 3
 4
 5
 6
 7
 8
 9
10
11
12
13
14
15
16
17
18
19
| import React from "react";
type UploadProps = {
setFile: (file: File) => void;
};
const Upload = ({ setFile }: UploadProps): JSX.Element => {
return (
<div style={{ margin: "auto" }}>
<input
accept="application/pdf"
type="file"
onChange={(e) => setFile(e.target.files![0])}
/>
</div>
);
};
export default Upload;
|
Finally, import Upload into App and render it.
 1
 2
 3
 4
 5
 6
 7
 8
 9
10
11
| import React, { useState } from "react";
import Upload from "./Pages/Upload";
const App = (): JSX.Element => {
const [file, setFile] = useState<File>();
return <Upload setFile={setFile} />;
};
export default App;
|
Loading Files into Zuva API
Now that users may upload files to the React app, create another file named Loading.tsx in /src/App/Pages. This React component will accept a file, use Zuva API to process it, and call functions passed to it in its props to update its parent component with the API responses. Also included is onReset, which will allow users to go back to the upload stage if they do not want to continue loading their document.
 1
 2
 3
 4
 5
 6
 7
 8
 9
10
11
12
13
14
15
16
17
18
19
20
21
22
23
24
25
26
27
28
29
30
31
32
| import React, { useEffect, useState } from "react";
import fields from "../../fields.json";
import { ExtractionResults } from "../../types";
import { Document } from "../utils/recognitionResults";
const BASE_URL = "http://localhost:3001";
type LoadingProps = {
file: File;
onReset: () => void;
setResultsText: (resultsText: ExtractionResults) => void;
setImageBaseUrl: (imageBaseUrl: string) => void;
setLayouts: (layouts: Document) => void;
};
const Loading = ({
file,
onReset,
setResultsText,
setImageBaseUrl,
setLayouts,
}: LoadingProps): JSX.Element => {
return (
<div style={{ display: "flex", flexDirection: "column", margin: "auto" }}>
Loading
<button onClick={onReset}>Reset</button>
</div>
);
};
export default Loading;
|
Submitting Files
To submit files to Zuva, put the following code into the function body for Loading. This code will create a POST request to submit file when it is changed, and then update fileId with the ID assigned to the file.
 1
 2
 3
 4
 5
 6
 7
 8
 9
10
11
12
13
14
15
16
17
18
19
20
21
| const [fileId, setFileId] = useState<string>();
useEffect(() => {
const postFiles = async () => {
setFilesLoading(true);
const response = await fetch(`${BASE_URL}/files`, {
method: "POST",
headers: {
Accept: "application/json",
"Content-Type": "application/pdf",
},
body: file,
});
const json = await response.json();
// fileId stored for use by subsequent API calls
setFileId(json.file_id);
};
postFiles();
}, [file]);
|
Creating Requests
The OCR and Extraction API endpoints work by creating a POST request to get a request_id, and then polling a GET endpoint with the request_id to check the status of the request until it indicates that the request has been completed. These functions will initiate a request and return the request_id once the request has been completed. Put the following code where it will be accessible in Loading.
 1
 2
 3
 4
 5
 6
 7
 8
 9
10
11
12
13
14
15
16
17
18
19
20
21
22
23
24
25
26
27
28
29
30
31
32
33
34
35
36
| const headers = {
Accept: "application/json",
"Content-Type": "application/json",
};
const getRequestStatus = async (url: string, status: string) => {
let statusText = status;
while (statusText == "processing" || statusText == "queued") {
statusText = await new Promise((resolve, reject) => {
setTimeout(
async () =>
fetch(url, {
method: "GET",
headers,
})
.then((response) => response.json())
.then((json: { status: string }) => resolve(json.status))
.catch(reject),
2000,
);
});
}
};
const processRequest = async (url: string, body: string) => {
const postResp = await fetch(url, {
method: "POST",
headers,
body,
});
const postJson = await postResp.json();
const { request_id, status } = postJson.file_ids[0];
await getRequestStatus(`${url}/${request_id}`, status);
return request_id;
};
|
Collecting Responses
Extractions results text response is needed to determine the annotations for a document. To get these data, create an extraction request, get the extraction request status, and then get the extraction results. This can be done in Typescript by leveraging the code from Creating Requests.
The following code will call the setResultsText prop with the extraction results as a parameter when fileId is modified. Put it in the function body of Loading.
 1
 2
 3
 4
 5
 6
 7
 8
 9
10
11
12
13
14
15
16
17
18
19
20
21
22
23
| useEffect(() => {
if (!fileId) return;
const processExtraction = () => {
const requestId = await processRequest(
`${BASE_URL}/extraction`,
JSON.stringify({
file_ids: [fileId],
field_ids: fields.map((f) => f.field_id),
}),
);
const resultsTextResponse = await fetch(
`${BASE_URL}/extraction/${requestId}/results/text`,
{ method: "GET", headers },
);
// set result
setResultsText(await resultsTextResponse.json());
};
processExtraction();
}, [fileId]);
|
The information needed to populate pages can be transformed in a similar way using responses from get OCR page image and get OCR layouts.
The following code will call the setImageBaseUrl and layouts props with the extraction results as a parameter when fileId is modified. Put it in the function body of Loading.
 1
 2
 3
 4
 5
 6
 7
 8
 9
10
11
12
13
14
15
16
17
18
19
20
21
22
23
24
25
26
| useEffect(() => {
if (!fileId) return;
const processOCR = () => {
const requestId = await processRequest(
`${BASE_URL}/ocr`,
JSON.stringify({ file_ids: [fileId] }),
);
const layoutsResponse = await fetch(
`${BASE_URL}/ocr/${requestId}/layouts`,
{
method: "GET",
headers,
signal: controller.signal,
},
);
const arrayBuffer = await layoutsResponse.arrayBuffer();
// set result
setImageBaseUrl(`${BASE_URL}/ocr/${requestId}/images`);
setLayouts(Document.decode(new Uint8Array(arrayBuffer)));
};
processOCR();
}, [fileId]);
|
Finally, update App to conditionally render Loading.
 1
 2
 3
 4
 5
 6
 7
 8
 9
10
11
12
13
14
15
16
17
18
19
20
21
22
23
24
25
26
27
28
29
30
31
32
| import React, { useState } from "react";
import Loading from "./Pages/Loading";
import Upload from "./Pages/Upload";
const App = (): JSX.Element => {
const [file, setFile] = useState<File>();
const [resultsText, setResultsText] = useState<ExtractionResults>();
const [imageBaseUrl, setImageBaseUrl] = useState<string>();
const [layouts, setLayouts] = useState<Document>();
const onReset = () => {
setResultsText(undefined);
setImageBaseUrl(undefined);
setLayouts(undefined);
setFile(undefined);
};
return file ? (
<Loading
file={file}
onReset={onReset}
setResultsText={setResultsText}
setImageBaseUrl={setImageBaseUrl}
setLayouts={setLayouts}
/>
) : (
<Upload setFile={setFile} />
);
};
export default App;
|
Using Document Viewer
Create a new file named Viewer.tsx in /src/App/Pages and populate it with the imports it will need.
 1
 2
 3
 4
 5
 6
 7
 8
 9
10
11
12
13
14
15
16
17
18
19
20
21
22
23
24
25
26
27
28
29
30
31
| import React from "react";
import fields from "../../fields.json";
import { BoundingBox, ExtractionResults, Token } from "../../types";
import {
Character,
CharacterRange,
Document,
} from "../utils/recognitionResults";
import DocumentViewer from "@zuvaai/document-viewer";
type ViewerProps = {
file: File;
resultsText: ExtractionResults;
imageBaseUrl: string;
layouts: Document;
onReset: () => void;
};
const Viewer = ({
file,
resultsText,
imageBaseUrl,
layouts,
onReset,
}: ViewerProps): JSX.Element => {
return <div />;
};
export default Viewer;
|
Annotations
Annotations can be mapped from the results in resultsText, as all the required data is contained in the results with additional nesting/a different format.
Include the following code in the Viewer function body to transform resultsText into annotations.
 1
 2
 3
 4
 5
 6
 7
 8
 9
10
11
12
13
14
15
16
17
18
19
| const annotations = resultsText.results
.map((result) => {
const topic =
fields.find((field) => field.field_id == result.field_id)?.field_name ||
"";
return result.extractions.map((extraction) =>
(extraction.spans || []).map((span) => ({
characterStart: span.start,
characterEnd: span.end,
pageStart: span.pages.start,
pageEnd: span.pages.end,
top: span.bounds.top,
left: span.bounds.left,
topic,
})),
);
})
.flat(2);
|
Name
As name is a property of File objects, name can be taken from file.
1
| const name = file.name;
|
Pages
pages in Document stores the data needed to fill out page data in Document Viewer’s pages prop, and imageURL can be generated by appending the page number to imageBaseUrl, but tokenURL is a bit more involved since there is no corresponding endpoint in Zuva API.
1
2
3
4
5
6
| const pages = layouts.pages.map((page, index) => ({
originalHeight: page.height,
originalWidth: page.width,
imageURL: `${imageBaseUrl}/${index + 1}`,
tokensURL,
}));
|
However, Document Viewer allows tokensURL to be a function that returns a Promise for an array of Token, meaning that it will accept a function that returns a Promise for an array of tokens generated from Document.characters. A Token is a contiguous string of Character separated by whitespace, so it can be reduced from Document.characters and the range of a page.
Include the followiwng code where it can be accessible to Viewer:
 1
 2
 3
 4
 5
 6
 7
 8
 9
10
11
12
13
14
15
16
17
18
19
20
21
22
23
24
25
26
27
28
29
30
31
32
33
34
35
36
37
38
39
40
41
42
43
44
45
46
47
48
| // mergeBoundingBoxes returns a BoundingBox that is the combined bounds of a
// Token and a Character
const mergeBoundingBoxes = (
token: Token | undefined,
{ boundingBox: { x1, y1, x2, y2 } }: Character,
): BoundingBox => ({
top: Math.min(token?.boundingBox.top || y1, y1),
left: Math.min(token?.boundingBox.left || x1, x1),
bottom: Math.max(token?.boundingBox.bottom || y2, y2),
right: Math.max(token?.boundingBox.right || x2, x2),
});
// determineLine determines if a BoundingBox is higher or lower than a Token,
// returning the token's line if it is not and the token's line + 1 if it is
const determineLine = (token: Token, { top, bottom }: BoundingBox) =>
top < token?.boundingBox.bottom && bottom > token?.boundingBox.top
? token.line
: token.line + 1;
const generateTokens = (
characters: Character[],
{ start, end }: CharacterRange,
): Token[] =>
(characters || [])
.slice(start, end)
.reduce<(Token | undefined)[]>((tokens, character, i) => {
if (i == 0) tokens.push(undefined);
const token = tokens[tokens.length - 1];
const boundingBox = mergeBoundingBoxes(token, character);
if (character.unicode == 32) {
if (token != undefined) tokens.push(undefined);
} else {
const lastToken = tokens[tokens.length - 2];
const line = lastToken ? determineLine(lastToken, boundingBox) : 0;
tokens[tokens.length - 1] = {
characterStart: token?.characterStart || start + i,
characterEnd: start + i,
line,
boundingBox,
};
}
return tokens;
}, [])
.filter((item): item is Token => !!item);
|
A caveat of this approach is that line is guessed from character/bounding box positions, so there may be inconsistencies depending on how OCR interpreted the file.
The final result for pages should be:
1
2
3
4
5
6
7
8
9
| const pages = layouts.pages.map((page, index) => ({
originalHeight: page.height,
originalWidth: page.width,
imageURL: `${imageBaseUrl}/${index + 1}`,
tokensURL = () =>
new Promise<Token[]>((resolve) =>
resolve(generateTokens(layouts.characters, page.range)),
),
}));
|
Topics
As topics corresponds to the names of fields that have been extracted and are to be displayed, it can be generated by extracting all the field_names from fields.json
1
| const topics = fields.map((field) => field.field_name);
|
Using Zuva Document Viewer
Now that the variables for all the props needed to display a document exist, render the following in Viewer instead of an empty <div />
1
2
3
4
5
6
7
| <DocumentViewer
annotations={annotations}
name={name}
onClose={() => {}}
pages={pages}
topics={topics}
/>
|
Finally, update App to conditionally return Viewer.
 1
 2
 3
 4
 5
 6
 7
 8
 9
10
11
12
13
14
15
16
17
18
19
20
21
22
23
24
25
26
27
28
29
30
31
32
33
34
35
36
37
38
39
40
41
42
43
44
| import React, { useState } from "react";
import Loading from "./Pages/Loading";
import Upload from "./Pages/Upload";
import Viewer from "./Pages/Viewer";
import { ExtractionResults } from "../types";
import { Document } from "./utils/recognitionResults";
const App = (): JSX.Element => {
const [file, setFile] = useState<File>();
const [resultsText, setResultsText] = useState<ExtractionResults>();
const [imageBaseUrl, setImageBaseUrl] = useState<string>();
const [layouts, setLayouts] = useState<Document>();
const onReset = () => {
setResultsText(undefined);
setImageBaseUrl(undefined);
setLayouts(undefined);
setFile(undefined);
};
return resultsText && imageBaseUrl && layouts && file ? (
<Viewer
file={file}
resultsText={resultsText}
imageBaseUrl={imageBaseUrl}
layouts={layouts}
onReset={onReset}
/>
) : file ? (
<Loading
file={file}
onReset={onReset}
setResultsText={setResultsText}
setImageBaseUrl={setImageBaseUrl}
setLayouts={setLayouts}
/>
) : (
<Upload setFile={setFile} />
);
};
export default App;
|
Full Demo
The full code of this tutorial is available on Github as a project written in plain Typescript. To run the demo:
- run
yarn serve in the docai-proxy directory - run
yarn dev in the frontend directory - open
localhost:3000 on your web browser
Please note that the demo has slightly different code from what is presented in the tutorial, using @mui/material for additional styling as well as some additional type checking and error handling in Upload and the use of AbortController in Loading.